Wednesday, May 22, 2013

Mountain Bike Teardown

In case you're tired of seeing me restoring old road bikes, here's an early 90s Specialized Hardrock. Most mountain bikes from the late 80s to late 90s are very similar. The better ones have lighter frames and nicer parts, but they tend to come apart the same way. I started this project with the wheels, saddle, seatpost and chain removed:


It's always a good idea to check the rim strips on an old bike, otherwise you might be chasing down mystery flats for a while. This one is nicely intact:

I already repacked the wheel bearings earlier, but here's a link in case you want to know how. My next step was taking the bottom bracket apart:

With the dustcap off, I just used a 14mm socket and ratchet to remove the crank bolt:

Next I threaded in the crank puller, then removed the right side crank:

Yay:


 Now the left crank (exact same procedure):
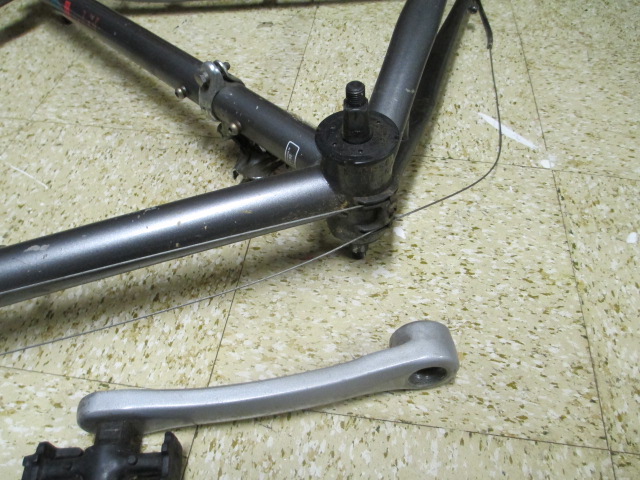
Time do deal with those cables. This frame has slotted cable stops, which let you remove the cable from the frame without disconnecting it from anything. Just put some slack in the cable, then pull the housing out of the cable stop:
 

Now I can remove the rear derailleur from the frame:

Let's get back to that bottom bracket now that the rear derailleur won't be resting under the frame. You need to unscrew the lockring on the left side. I have a special tool for this, but you can use a hammer and punch if you don't care as much:

This adjustable cup only has small dimples in it for removal. There's a special pin spanner from Park Tool that you're supposed to use, but this worked too. I just needed to push down while turning the pliers:

With the adjustable cup out, you can remove the spindle. That plastic tube is a grease shield. The bearings were pretty dirty inside, so I don't think it did much good.

To remove the fixed cup, you'll need a nice big wrench. This one comes out clockwise. I suppose the reverse thread is supposed to keep it in place, but a loose cup can still unscrew itself as you ride regardless of which way it's threaded.

Eww:

Now I want to remove the handlebars and fork to grease the headset. Since I hate trying to shove a used cable through a Z-Link connector wire, I'll just remove the brake instead:

It's not a bad idea to do this anyway because you can grease the cantilever studs and make the brakes work a little nicer. After unhooking the rest of the cables from the frame, I can move the handlebar assembly safely out of the way.

The fork is secured  by a threaded bearing race and a locknut. First remove the locknut:

Now the top race can be unscrewed by hand. Keep track of any spacers, these are usually important.

With the race off, you can slide the fork out and remove the bearings.

Now you can clean the bearings, and replace any parts that are damaged or worn out since the frame is pretty much bare now. I like to soak bearings in mineral spirits overnight. This usually dissolves any old grease. I left the cables attached to the derailleurs and brakes to make it easier to adjust them later. I also left the front derailleur on the frame so I don't have to spend lots of time repositioning it. My next post will cover how to reassemble the bike in better working order.

Wednesday, February 6, 2013

Spoke Replacement

Ever have one of those days when you're going to work on something and expect it to take 5 minutes, but it turns into 5 hours? In my last post I showed how to service a rear hub with a freewheel. I didn't show this however:


The outer drive side spokes were mangled up from the chain jamming into them (a dork disk doesn't seem quite so bad now). Worried that these spokes might snap on a long ride, I decided to replace all 9 of them. I'll walk you through this process in case you have a busted spoke on your own bike. 

The first step is to remove the freewheel or cassette (rear spokes break more often than front ones). Next deflate the tire, and unscrew the spoke from the spoke nipple at the rim:


Here I removed the tire, but you can usually just leave it in place if you're only doing a few spokes. Now measure the offending spoke so you can find an adequate replacement:


You want to measure from the end of the threads to the inside of the curve at the elbow. Generally you can go plus or minus 2mm if you don't have the exact size available. Put some grease or oil on the threads, then stick the replacement spoke through the hub:


 Work it around the other spokes and join it to the rim with a spoke nipple:


Finally, put the wheel back in your frame, and tighten the replacement until the rim spins straight again:


That's all, cheers!

Saturday, February 2, 2013

Freewheel Hub Bearings

I took some pictures of the freewheel hub on one of my older bikes. I previously did a tutorial on servicing a cassette hub's bearings here, but I thought this could be useful too. First you need to remove the freewheel:


It's a good idea to brace the tool with the axle nut or quick release while you break the freewheel loose, they can be pretty stuck. Anyway once the freewheel is off (more info on removing them here), you can loosen one of the locknuts while holding the axle cone steady with a cone wrench:


Many times on a freewheel hub you can just used two regular wrenches on the drive side, since the locknut and cone are sometimes spaced far enough apart to fit a standard wrench on the cone. With the locknut and spacers out of the way you can unscrew the cone:


Then slide out the axle and remove the bearings:


And clean them well:


I like to use mineral spirits, but it's pretty nasty on your bare hands. Now pack the cups with grease and place each ball bearing back inside. There are usually 9 on each side.


Slide the axle back in place and screw the cone back on:


Then replace any spacers and the locknut:


On this particular hub there are 2 locknuts on the right hand side, so I tightened the inner one against the cone first:


 Then the outer locknut against the inner one:


The last step is to adjust the bearings to make sure the wheel doesn't have play and turns easily. For solid axles you adjust the bearings for no play in the axle, and minimal drag as you turn it (slight drag is preferable to having play here). For hollow axles with quick release skewers you want a very slight, almost imperceptible amount of play because the skewer will tighten the bearings a little bit more.

Saturday, January 26, 2013

Deore XT Hub Overhaul

Here's something special for you bike nerds. I repacked my gold label M-738 XT hub (the one with an aluminum axle) and took some pictures for ya. If you're doing the same thing to a similar hub first you'll have to remove the rubber dustcaps. Use a small thin screwdriver to pry them out like shown:


Don't pry it out between the hub shell and the dustcap, you'll just waste your time and possibly nick the hub. Next you remove one of the outer locknuts. On this particular hub you need a 17mm cone wrench for the locknut, and a 13mm for the cone:


I have no idea why they made you get a 17mm cone wrench for the locknut, but that's the only way to do it on these. Here's the locknut and washer removed, and the cone partially unscrewed:


Normally the cone just comes straight off, but the cones on this hub are a bit different. You might have to turn the cone slightly until it wants to come out, because it will catch on the ball bearings in certain positions. The cones have a long extension that threads deeply onto the axle to avoid putting stress on the aluminum. This extension piece has 10 splines to fit around the ball bearings for assembly, but if the splines aren't aligned with the bearings then it won't slide out. With the axle out of the way though, you can remove the ball bearings:


Make sure you have all 20 bearings:

 
Now clean everything. These bearings have a mirror finish when they're clean:


Grease time:


Stick the ball bearings back into the hub after you grease it:


Now reinsert the axle and thread the cone back on until play just disappears:


You might have a little trouble getting the splines to slide around the bearings, but keep turning it little by little and it'll fit. Now thread the locknut and washer back on:


And tighten them together:


Don't force them together with barbaric abandon, the threads on the aluminum axle are much softer than steel. The bearings are adjusted properly when there's a slight amount of play in the axle, so if they're too tight you can easily loosen them by using two 13mm cone wrenches on the cones and unscrewing them.


Do this in small increment's until the adjustment is perfect. The last step is to slide the rubber seals back on:


I like to put a little oil between the seal and the hub to reduce friction, but it's not really necessary. It's more important that they're seated evenly, so make sure to push them all the way on, and push from around the axle to seat them in place. That's it. These hubs have a few special details, but they're nothing too fancy after all.

Monday, January 21, 2013

Saddle Repair

Sometimes you get a bike with a rock hard saddle that's completely unrideable after 20 feet. If you can remove the top layer, then there's really nothing stopping you from adding more foam underneath to make it more comfortable.


For this one all I had to do was peel off the top layer from the back side and pull it forward. Sometimes the top is held on with some staples, which can also be removed as long as you can replace them later. Next I found some foam:


And cut some pieces from it:


Now I stuffed them into the top layer before wrestling it back together:


I had to use a tire lever to shove the last bit on, but it worked:


Now rather than riding on a piece of steel with a thin layer of vinyl on top, this saddle can actually be useful. This definitely beats using one of those padded seat covers that slide around a lot.

Wednesday, January 16, 2013

Gross!

I took apart the bottom bracket on an old Raleigh and this is what I found:


Eww right?

Front Derailleur Installation

The front derailleur is a crude mechanism that shunts the chain from one chainring to the next. These are not difficult at all to install, but they are very sensitive to adjustment. I've heard lots of bikes that have their front derailleurs completely out of adjustment. The chain will constantly rub the derailleur's cage, making a pretty obnoxious sound. If you ignore it, then this happens:


If you ignore it even more, then this happens:


The chain will eventually cut through the cage, rendering the derailleur completely useless (although I suppose the constant clattering noise will diminish once the cage has a hole in it). Anyway, this post is about setting up a front derailleur on your bike. I installed this derailleur on a bike with the chain attached by removing the little screw and bushing at the back of the cage:


Next I slid the chain through the cage and loosely clamped the derailleur to the seat tube:


Try to align the cage plates to run parallel with the chain. The next step is to bolt the cable onto the derailleur for fine tuning:


You'll notice two small screws on the derailleur, sometimes marked H and L. These are the limit screws, and they play a big role in whether the chain will rub the cage or not. To adjust these, first shift the chain into first gear (biggest gear in back, smallest chainring in front):


Now adjust the low limit screw (marked L) so that the inner cage plate is as close to the chain as possible, without actually touching it as you turn the pedals:


Next shift the chain into the highest gear combination (smallest gear in back, biggest front chainring):


Now you can adjust the high limit screw (marked H). You will screw it in until the outer cage plate is close to the chain, but again doesn't touch:


The derailleur's height is important too. If it is too high, the chain will likely rub the cage in the cross chaining gear combinations. It might also be sluggish to shift the chain to the bigger chainring too.


For most modern derailleurs you will want the cage to pass as close as possible to the biggest chainring without touching it, like this setup:


Unfortunately on older derailleurs like this one, this can cause the chain to jam between the inner cage and the teeth on the big gear as you try to shift. To fix this, position the derailleur a few millimeters higher than normal, like this:


If you do reposition the derailleur, then recheck the limit screw adjustments and tighten down the clamp bolt once you're satisfied with it. These adjustments take some practice, and some trial and error. Be patient, adjust in small increments, and eventually you'll find a nice setup.

Note: If you have an indexed double chainring setup, the low limit screw determines the resting position of the front derailleur on the small gear. The shifter determines the position on the bigger gear, but the high limit screw still needs to be adjusted to prevent the chain from overshooting the big ring. You will use the barrel adjuster that's connected to the front derailleur's cable to set the position of the front derailleur in the big gear.
If you have an indexed triple chainring, then the limit screws will control the smallest and biggest chainrings. The shifter will control the middle position, so use the barrel adjuster to position the cage where it doesn't rub the chain while it's on the middle chainring.