Sunday, January 18, 2026

Schwinn Prelude Restoration

Ever since I was in college I really wanted a Schwinn Prelude. I thought it was a really high-end bike at the time, but much more realistically affordable than a Paramount. I finally found an inexpensive 1987 model for sale, but it needed a lot of work. I took the wheels and the busted saddle saddle off (and thankfully the aluminum SR Laprade seatpost didn't fight me too much. They're often rust welded in place).


Next I took the brakes off for cleaning and repairs (don't mind the reflector, it's not going back on):


The cables came out of the brake levers without issue:

Next I removed the handlebars:


 Then the fork:

The headset bearings were in good shape. The only caveat was the corrosion on the outside of the lower bearing race. This bike might have either sat outside or in a damp basement for way too long. I removed it to try cleaning it up:


 Next I removed the drivetrain for cleaning. The rusty chain needed to go:


 Then I removed the derailleurs:


 Next the cranks:


 And then the bottom bracket:


 The bearing cups had a retaining ring holding the ball bearings in place. I pried it out in order to properly clean the bearings underneath:

 The hub bearings were next. I removed the freewheel:


 Then I unscrewed the bearing cones and removed the ball bearings for cleaning:

The quick release skewers were very rusty, but I was able to clean them up with Naval Jelly:

The axles and bearings also cleaned up nicely with mineral spirits:


 Time for reassembly. I repacked the hub bearings with automotive grease:


 Same with the bottom bracket cups. I omitted the retainer rings because they were bent up from removal, and aren't really necessary anyway.


 I repacked the headset bearings with marine bearing grease, in case I ever get caught in the rain.


 I also pressed the lower headset cup back into the frame. The rust dissolver removed the surface rust, but it's still pitted. Oh well.


 Now the fork can be reinstalled:


 I had to do something about the rim strips. The original soft rubber ones that came with the bike are too narrow to fully cover the spoke holes in the rim, and I have no idea how the inner tubes ever held pressure. 


 That's better: 

 Now I can start hanging parts on the frame. I grabbed a white saddle and a pair of period-correct MKS AR-8 pedals from my local bike co-op. I reinstalled the original drivetrain, which looks quite nice when it's all cleaned up: 


 I wrapped the handlebars in white:


 Before re-installing the cables, I like to take a file and round off any sharp corners on the ends of the cable housings:


 Finally, here's the finished bike:


 This bike looks the same as a more common Schwinn LeTour, but there are a couple differences. The tire clearances are narrow, and a 32mm tire will not fit. The Colombus steel tubing on the Prelude was more expensive than the True Temper frame on a LeTour from the same era, but the weight difference is insignificant. As for how it rides, I think the Prelude is one of my best handling road bikes. It's agile, but stable at higher speeds. It also feels very fast on the skinny 23mm wide tires. My college self would have been thrilled to have it.

Friday, May 31, 2024

Waterproof Grease

For years, I have preferred to use water resistant grease in places like bottom bracket bearings or wheel bearings. Bike components usually aren't well sealed against water intrusion, so marine bearing or automotive wheel bearing grease will do a better job protecting bearings from corrosion.

Below is an example of poorly sealed front hub bearings that were ridden in wet conditions. They were not lubricated with marine bearing grease:

Obviously these won't roll very well anymore, so new ball bearings were necessary. 

Additionally, I would avoid using white lithium grease. I've seen plenty of pitted and worn out bearing surfaces that were packed full of plain white lithium grease. It has no anti-wear or extreme pressure additives, so it's not suitable for the impacts that bike wheels experience on the road.

Discount Velox Tape


Back to bike stuff! In the past, I preferred to use Velox cloth rim tape to cover the spokes on the inside of a rim, especially for double walled rims. My local bike shop doesn't carry it anymore, and they want a bit too much money for their plastic rim strips. As an alternative, I found a 25' roll of this 5/8" wide woven cloth at Menards for $3:

I cut a length off the roll after wrapping it around the rim, then sprayed one side with contact adhesive:


Now this cloth tape should work similarly to Velox, although it will probably be more difficult to remove later on if needed. That can be a problem for future me. Also, it's slightly thicker, making it harder to mount a tire. So it's not an ideal replacement, but it's good enough for me. Cheers!

Friday, December 1, 2023

Saab 9000 Head Gasket

I got to work on another obscure European car, this time a Saab 9000. For a long time, this was leaking oil from the area between the timing cover and the cylinder head. As the leak got worse it started leaving small puddles of oil everywhere it was parked, so I finally had to do something about it.

The disassembly process was mostly straightforward - remove the exhaust manifold, remove the accessory drive belt, unmount the AC compressor and remove its bracket, drain the coolant, disassemble the intake manifold, unscrew the timing chain tensioner, and then remove the head bolts. With the cylinder head off, there doesn't seem to be anything amiss with the original gasket.

However, underneath the head gasket, the timing cover was not flush with the surface of the engine block. This was causing the oil leak. I should have taken a picture but oh well.

There were some additional things I wanted to do while the cylinder head was on my bench. It was fairly dirty inside, and I wanted to disassemble and clean it before putting it back on the engine.

I put the valves, springs, and lifters together on a sheet of paper to keep everything organized:


The intake valves were nice and clean, but the exhaust valves were a little bit dirty and pitted. I cleaned them in a wire wheel mounted in a drill, then hand lapped them in their seats:


After lapping:


I used a deep socket to push the new valve seals into place:

Reassembling the head was a bit tricky, since the valves and springs are pretty well recessed. I compressed the valves and fed the spring retainers into their grooves with a pocket screwdriver with a dab of thick grease on the end. The grease held the retainer on the tip of the screwdriver as I maneuvered the retainer onto the grooves on the valve. It was a surgical operation.

After scraping the head and block mating surfaces with a razor blade, I added a small amount of RTV silicone around the timing cover and installed the new head gasket:

After maneuvering the cylinder head around the timing chain guides, here it is back on the engine:

There are always some more "while you're in there" items to do on an old car with lots of miles on it. This heater hose looked pretty worse for wear, so it needed replacement. 


Saab, being the weirdos that they are, made a hose that's 5/8" on one end, and 1" diameter where it joins the head. This specific hose wasn't available, but Gates 19663 for a 1987 Ford Aerostar has the correct inner dimensions and just needed to be cut to length.

Several hours of reassembly later, everything is back together:

The worst part was dealing with the 3 piece intake manifold, since the bolts needed to line up exactly with their support brackets and many of them weren't in line of sight. The timing chain tensioner also has a rubber o-ring inside that needed replacement. I happened to have a viton 9mm inner diameter, 2.5mm thickness o-ring that fit perfectly.

Fingers were crossed, and after idling the engine for several minutes there is no longer an oil leak under the head:

Cheers!

Wednesday, May 3, 2023

Audi 5000 Revival V - Odds and Ends

The car is almost ready to go down the road, but there are still a few little things to take care of.  The fuel filler neck was flaking with rust, and I was worried it might be leaking gas. Fortunately, it wasn't rusted all the way through, and it was only the paint flaking off. 

I used naval jelly to dissolve the rust like I did on the valve cover, then repainted it an unassuming shade of gray.

Underneath the car, this muffler insulator has seen better days:

Luckily I found a new one for $1.50.

An interesting thing about the front suspension is that there are factory stock camber plates for camber alignment:

Anyway, here's the finished result:


It looks pretty much the same as when I started, but it certainly drives a lot better.

Tuesday, May 2, 2023

Audi 5000 Revival IV - Timing Belt

The timing belt on this car actually doesn't look too bad, but without documentation of a recent change I really can't trust it. This will leave you stranded if it breaks, and potentially damage the engine. Audi mounted this 5 cylinder engine as far forward as possible, so to make my life easier I decided to remove as much of the front end as I could:


That's a little better. The accessory belts come off by loosening the mounting bolts, and then unscrewing tensioning bolts on the alternator, power steering pump, and AC compressor. Then to get to the timing belt, you just remove the front cover and unscrew the crank pulley. Yup, just unscrew the big bolt holding on the crank pulley:


Uggh. Apparently it's torqued by the factory to over 400 ft-lbs. With that much force, I can't simply put it in gear to hold the crankshaft in place. I might break the transmission. There's a special, hard to find tool meant to hold the crank pulley, but I'm not spending $150 on it. Instead I wedged a prybar against the notch in the crank pulley, and then jumped on my breaker bar to loosen that horrible bolt. With that out, the old timing belt could come off along with the crank sprocket and accessory belt pulley.

I decided to take the extra time and remove the rusty valve cover for repainting. The gasket was starting to leak anyway, so why not? Here's what the camshaft looked like:


The camshaft seal was starting to leak, so I replaced it while I was in there:


 Time to clean the oil and grease off the valve cover:


 I used naval jelly to dissolve the surface rust before painting it with black grill paint:


With the cover reinstalled, it looks a lot better:

And here is that horrible crank bolt: 


A curious thing about the timing belt on this engine - the water pump is the belt tensioner. It has two slotted bolt holes letting you rotate the pump in order to provide tension on the timing belt. It's a very strange arrangement, and the water pump makes a seal against the flat engine block with a large O-ring.

Now with a new water pump and belt installed, I can start reassembling the front of the engine. The timing marks weren't easy to find, so I just put matchmarks on the old belt and transferred them to the new one so the cam and crank will still be lined up. Then I pried against the water pump to tension the belt and tightened the water pump bolts to lock it in place. I also added some sil-glyde to the new water pump O-ring so it could slide across the engine block as needed.

Tightening the crank bolt was a little tricky, but I managed to nail some 2x4's together to brace against my pry bar:

Then I put my foot on my breaker bar and called it tight enough. With the engine back together, all that's missing is the rest of the front end:

Job done, cheers!

Audi 5000 Revival III - Brakes

The brakes on this car need attention. On very old cars, the calipers get corroded around the piston seal and can get stuck in place. This results in a stiff brake pedal that doesn't do very much braking. Replacement calipers are not even available for this car, but new seals are.

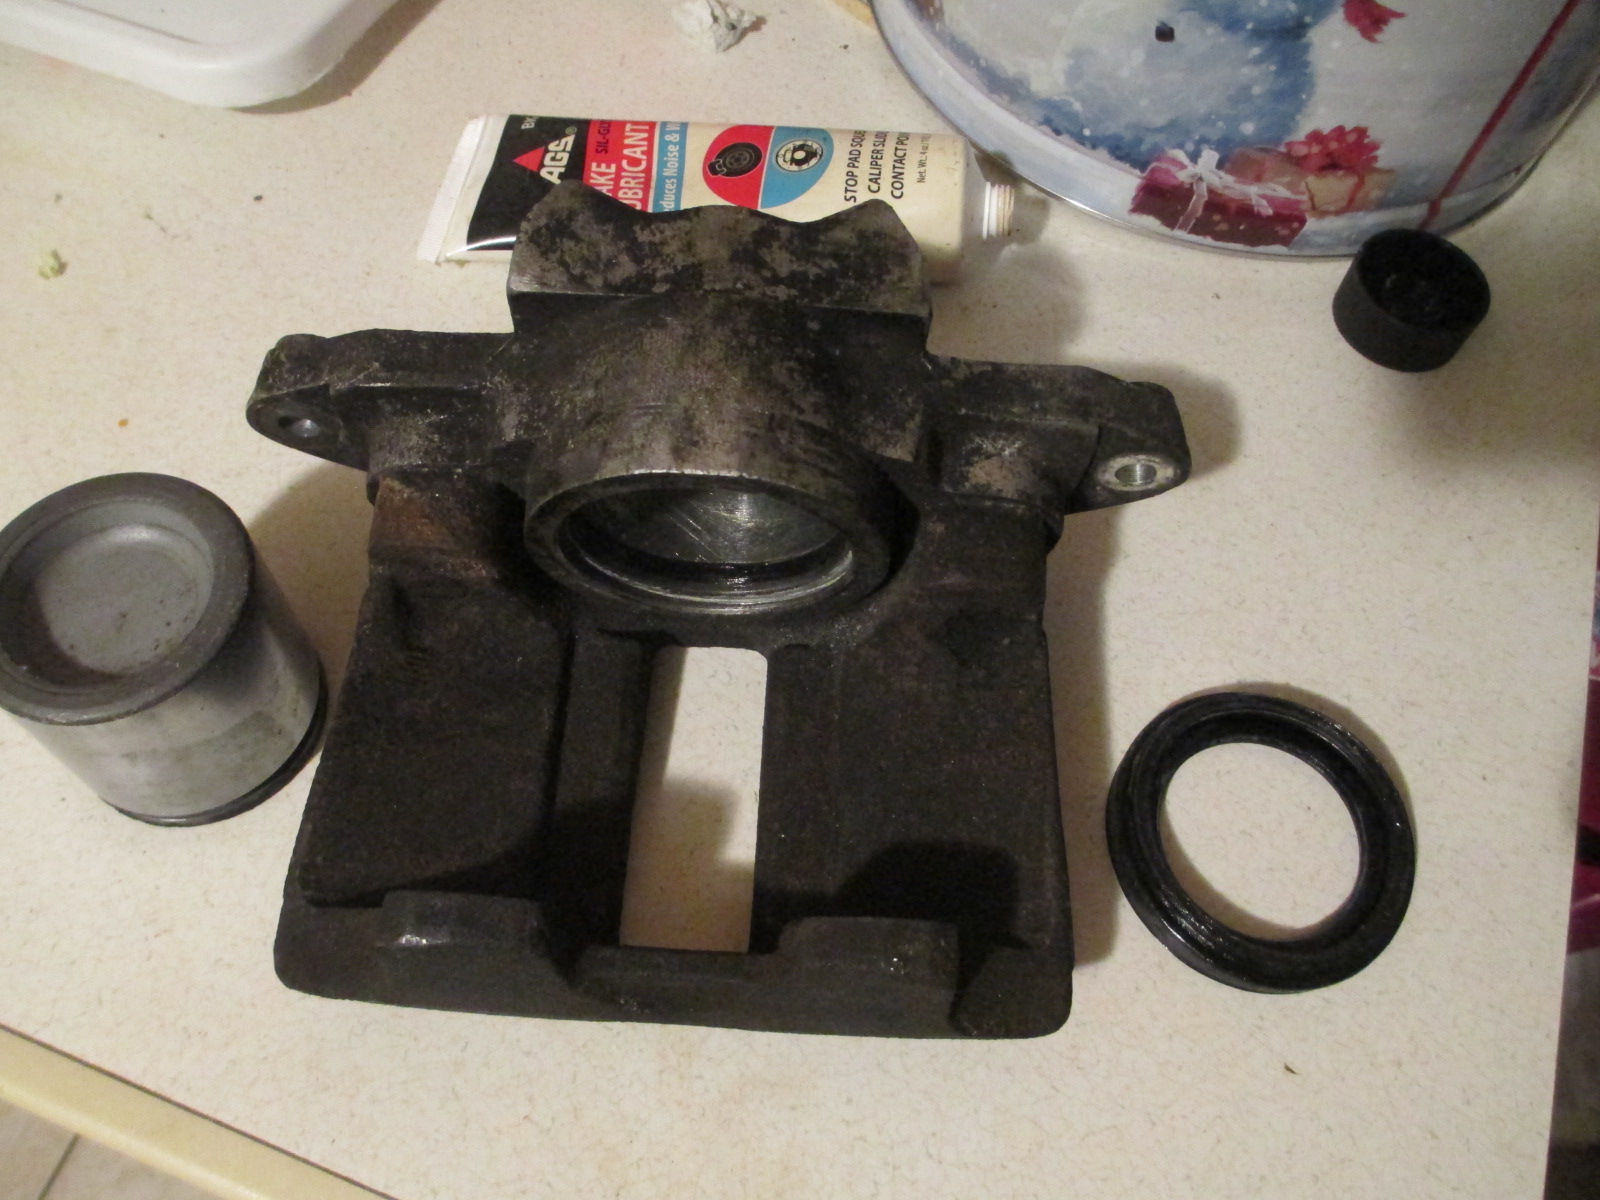
Getting the caliper pistons out was tricky. Normally I blast them with air from my compressor, but these wouldn't budge. I had to heat the aluminum part of the caliper on my stove to expand it enough to let the piston pop out.

Now I can clean the seal grooves and the piston with a wire brush. I like to install the new seals with a thin layer of Sil-glyde, which is compatible with brake rubber. This lets the piston slide in without trouble.

The outer dust seals on these VW style calipers are tricky to install. They need to tuck into a groove in the caliper, and they also fit tightly onto the caliper piston. The best way I found to install it was by first sliding the dust seal onto the edge of the piston, then tucking the seal into the groove on the caliper body:

Then with the dust seal fully seated in its groove, you can start pushing the piston into the caliper. If you did it right, the piston should slide in by hand with careful force.

As a finishing touch, I wire wheeled the rust off the cast iron portion and painted it with barbecue black paint:

The other side is the same process. Finally, I reinstalled the calipers with new flexible hoses and brake pads.

The rear drum brakes weren't working so great either. The wheel cylinders are fortunately easy to change, and don't require fully disassembling the brake shoes. Just remove the hold down springs and pull the shoes out of the way:

Now there's two 5mm allen screws and an 11mm brake line nut holding the wheel cylinder on. Good luck if they're rusted. A long time ago I ended up removing the entire brake and stub axle assembly from my brother's '84 Jetta in order to drill out the little screws holding the wheel cylinder in place. You don't need to go that far though. If the 5mm allen screw is stripped, hammer a 12 point 3/8" socket onto the head, or use a 3/8" bolt extractor. The latter option worked perfectly for me. Here's my prize:

Lucas parts are only the highest quality, as evidenced by the fact that one piston was seized in place, and the other one leaked.

The brake lines were another issue. One of the rear lines has two compression fittings on it:

Uggh. It would have been less work for the previous owner to just replace the whole 5' section with a new line. Well, now I get to do it. I ended up buying a pre-flared line because I just couldn't get a good bubble flare with the rental flaring tools. 

Securing the new brake line to the car body was actually rather easy. Since some of the metal retaining tabs had rusted away, I used insulated P-clips and rivets instead. To rivet the clips in place, I drilled holes into the car body:


It's important to paint the exposed metal after drilling to prevent corrosion (which is where the black paint smudge is). Next I installed a 3/16" rivet with some added anti-corrosive spray to secure the new line:


This is a much better method than using self-tapping screws. Now what's left is to connect the replacement brake hoses and bleed the system of air.


With new wheel cylinders, caliper seals, brake pads, hoses, and the new hard line, these brakes work a lot better.