Thursday, January 26, 2012

One Piece Bottom Bracket Overhaul

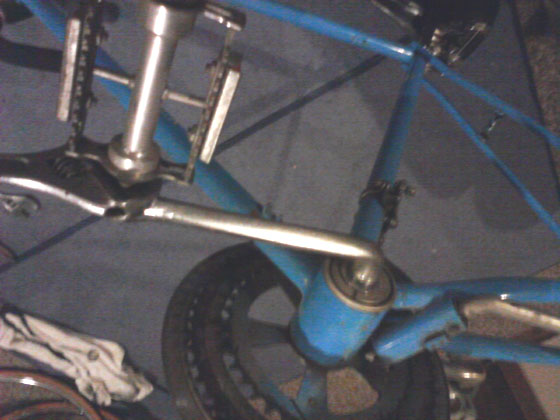
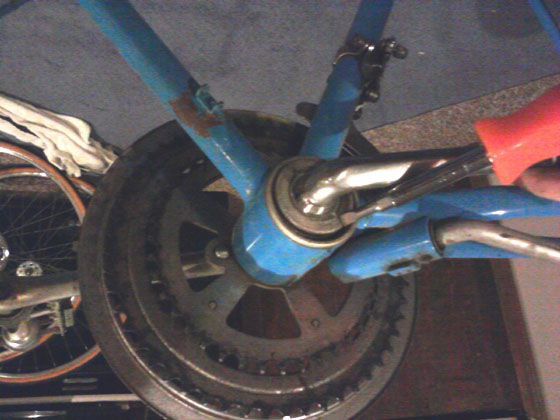
Most old American made bikes have one piece cranks. These cranks are a solid steel bar with two 90 degree (ish) bends which the pedals attach to. They're primitive, heavy, and fantastically durable. This procedure will show you how to overhaul these bearings. No special bike specific tools are needed, but you will need a big wrench that can fit a 1-1/4" large nut. If you don't have the wrench and your cranks don't have any play in them then dripping motor oil into each cup can get you by, but whats the fun in that? The bike shown here is a Schwinn Continental.

First remove the left side pedal. I often have good luck using a thin adjustable wrench. Remember it's reverse threaded:

Now remove the large nut on the left hand side. This is also reverse threaded:

Remove the keyed washer, then use a screwdriver to unscrew the cone (reverse threaded):

The next step is a little tricky. You have to slide the crank out through the bottom bracket shell. You'll need to remove the bearings from the frame cups first before the cranks can come out:

Now clean and grease the bearing surfaces:

Reassembly is the opposite of removal:

Once the crank is back in place, rethread the cone back onto the left side. Leave some play in the bearings for now:

Now replace the keyed washer, then the lock nut:

Here comes the trickiest part. You need to dial in the bearing's adjustment. There must not be any play, but the cranks should spin freely too. For some bikes, tightening the lock nut will dramatically increase the preload on the bearing, so be sure to spin the cranks after tightening. Make adjustments by loosening the nut, then turning the cone until you get the desired setting:

Again, there definitely should not be any play here once the lock nut is tightened, since the bearing cups are merely a press fit into the frame. Finally, retighten the left pedal and you're set.

Thursday, January 19, 2012

Schwinn Rear Derailleur Overhaul

Schwinn's popular Varsity and Continental models featured the Huret Allvit rear derailleur. It's not a particularly durable or precise derailleur, and they commonly won't shift well after years of neglect. Never fear, I'll show you how to fix these.


First unbolt the cable from the pinch bolt on the derailleur. The cable threads through the bolt itself, and is sandwiched by this stupid metal clip that serves only to fray the cable and make it difficult to remove. Unscrew the nut holding the cable on there, then pry the metal clip apart with a flat screwdriver. This is what I'm talking about:


Once the cable is out (feel free to cut it if the cable doesn't slide out), remove the tension pulley using either a 9mm wrench or socket:


Now slide the chain off the remaining pulley and loosen the bolt on the derailleur's claw which holds it onto the bike's frame (if you have a chain tool, it may be easier to just break the chain rather than remove the tension pulley right away). The derailleur should now slide off the frame, and you can begin cleaning the parts:


The pulleys on these derailleurs are cool because they have little ball bearings in them. Unfortunately they tend to get gunked up and don't spin freely. They can be disassembled by putting two 13mm wrenches on the flat parts and unscrewing. Here's a closeup:


Taking the pulleys apart isn't necessary however, and the guide pulley (the one you didn't remove yet) doesn't come off without removing the rest of the derailleur cage. Instead I recommend just dripping some oil into the pulley bearings. The pulleys should spin easily afterwards. The rest of the derailleur can be completely disassembled, quite unlike modern derailleurs. The steel plates that move the cage back and forth are secured by nuts and bolts, unfortunately these tend to loosen up during use.

The barrel adjuster screw may seize in place on these derailleurs. If it is hard to turn, use pliers to unscrew it completely, then clean and grease the threads before reassembling. The spring can even be omitted if the adjuster is especially hard to turn. This screw is only used to take the slack out of the cable upon reassembly.


Here is the nearly finished derailleur in all its glory:


Make sure the pulley cage's spring is contacting the stop. If the cage just flops around, rotate it counterclockwise until the spring catches the stop. The derailleur is installed in reverse of its removal, by sliding the claw back into the frame dropout, removing the tension pulley, looping the chain around the guide pulley, then reinstalling the tension pulley with the chain in place. Again, you can also break the chain if you have the proper tool, and reconnect it once the derailleur is back in place.
 
Finally, thread a clean and oiled cable through the outer housing pieces and bolt it onto the derailleur. Check the limit screw adjustment with the back wheel on, and make any adjustments if necessary. The screw on the front of the derailleur is the high limit screw, and the long one on the bottom is the low limit.

With the derailleur reinstalled, it's a good idea to clean the plates that move the pulleys back and forth. I like to shift the chain into the biggest gear and use a flat screwdriver to scrape the caked on grime from the derailleur's moving parts. Lubricate each pivot point with oil or WD-40 so that the mechanism can move freely:


Tuesday, January 17, 2012

Pedal Installation

Pedals have a few quirks. There are two different thread sizes (1/2" and 9/16") depending on the type of crank they're used on. Most bikes use the larger 9/16" size, which is the size shown in this tutorial. These are installed with a 15mm wrench. The 1/2" size are used on bikes with one piece cranks (old Schwinns, BMX, crappy department store bikes). Regardless of size, the left pedal is always reverse threaded to prevent it from unscrewing itself in use. Keep in mind however that pedals are not self tightening, and that loose ones will strip out the threads in the soft aluminum cranks, rendering them useless. With that out of the way, let's begin:


Right side assembly:

Left side assembly:

Finish tightening each pedal before moving on to other tasks. This way you won't forget to tighten them properly. There should be quite a significant amount of force holding them in place. Obviously you don't want to overdo it, but in this case undertightening them can be just as bad. Cheers.


Friday, December 23, 2011

Shimano Uniglide

Lots of 80s bikes have a unique type of cassette that uses a threaded cog on the end to secure the gear cluster to the hub. This is called uniglide, and was Shimano's first attempt at making a cassette hub. These cassettes have twisted teeth, without cutouts or special shift ramps. Here is a very early 6 speed uniglide cassette hub from 1982:

Notice the threads on the outside of the freehub body. These are for the last cog which holds everything else in place. To remove the cassette you can use 2 chain whips to unscrew the smallest cog, or you can leave the wheel on the bike, shift into the biggest gear, and put the chain whip on the small cog. If you pedal forward with the chain whip secured in place, the cog will unscrew.


The last photo shows the complete cassette. Notice how there is only a dustcap at the front of the freehub body. This means that you can't install a modern hyperglide lockring to this freehub body. Some late 80s/early 90s hubs have threads for both cassette types. 

There are lots of ways to modify a uniglide cassette hub. The threads on a uniglide hub are the same as a standard freewheel, as well as a bottom bracket lockring. If you lose the smallest cog you can still use a bottom bracket lockring to hold the rest of the cassette to these hubs. You can also add a track cog to these threads to make a cheap singlespeed bike. Also keep in mind that uniglide cogs can be installed backwards if they wear out, thus doubling the life of the cassette.

Finally, you can install a newer hyperglide cassette to a uniglide hub if you grind off part of the wide spline on each gear (Hyperglide cassettes have one spline that is thicker than the rest in order to line each gear up with the shift ramps on adjacent gears. Uniglide cassettes have a uniform spline pattern). If your hub doesn't have the inside threads for a hyperglide lockring, you can just omit the smallest cog and use a bottom bracket lockring to secure the cassette. These hubs have lots of little quirks to them, but are definitely worth keeping around if you find a bike with one.

Wednesday, December 21, 2011

Starter Motor

Remember when this blog used to be about bike repair? Well I haven't had to do any major repair work on my own bikes yet, so here is an automobile starter that I took apart (I need a life..). In case anyone cares, it's from a 3.0 liter OHV Ford Taurus motor. These are ridiculously easy to replace since they're held on by 2 easily accessible bolts. Don't get me started on the DOHC motors though ...


Here's a better shot with the brushes removed:

 The solenoid can be taken apart too but it's really not that interesting. It's just a magnetic on/off switch. When its "on" the starter will rotate. When you turn the ignition key, the solenoid activates the motor and your engine can start.

Monday, December 12, 2011

I got bored today

Ever wonder what a 25 year old oil filter looks like inside? Here's an old AC Delco PF-47 that's been in my garage as long as I can remember:


It looks like it belongs on a World War II fighter plane. Here's the filter cut open: 


The paper inside looks messy cause I was trying to pull it out. Here it is in all its glory:


Looks pretty good despite me hacking it to pieces. Anyway there's more bike related stuff on the way, possibly with better photos (stupid cellphone camera).

Sunday, November 20, 2011

Stripped Pedal Threads

(Yes, that's a spark plug.)

If you strip out the threads in the right hand crank, you can use a 14x1.25mm spark plug thread repair kit from a car parts store to fix it. Pedal threads are normally 9/16-20 tpi, but the metric size is actually close enough to work. If you strip the left hand crank, you can theoretically still use that kit but you'll need another right hand pedal and some threadlocker (you're better off just replacing the left crank).

Thursday, November 17, 2011

Rust Removal

There's a really easy way to remove mild to moderate surface rust from steel. You simply rub a piece of wet aluminum foil over the rusty part and it should become shiny again. This works especially well on chrome parts.
Rusty:
  
Shiny :)

Monday, October 31, 2011

Happy Halloween!

Here are some random pictures I've snapped while on my bike.


Happy Halloween

Sunday, October 23, 2011

Repacking Wheel Bearings

Here's a quick tutorial on repacking wheel bearings. Generally you should do this every couple of years if you ride regularly, especially if you ride offroad and your hubs aren't well sealed. Old bearings definitely need this because the original grease dries up and doesn't protect the bearing surfaces anymore. This tutorial shows a rear cassette hub. Front hubs are very similar, just skip the part about removing the gear cluster.

First you have to remove the cassette. You will need a cassette lockring tool and a chain whip.
Shove the lockring tool into the cassette and put a big wrench around it (the one shown is a 15/16" size, otherwise use a big adjustable wrench or a 1/2" drive breaker bar). Next push down on both tools to unscrew the lockring, this may need a lot of effort.

For freewheel hubs, insert the specific freewheel tool into the freewheel and wrench it off with lots of force, being careful not to let the tool slip. If you have a prong style remover, use the quick release skewer or axle nut to hold the tool tightly in place as you break the freewheel loose (Here's a quick tutorial to remove a freewheel).

Now slide off the cassette and place a cone wrench on the flat sides of the axle cone (the inner piece) and put an adjustable wrench tightly around the outer locknut:
After removing the nut and spacers, unscrew the cone. Be careful, since little ball bearings may fall out as the axle gets looser. Also keep track of the order of those spacers, especially if your hub has rubber seals on the outside. 
Now remove the axle and all the ball bearings inside the hub. There should be 9 per side on most rear hubs, and 10 per side on most front hubs. Use a small screwdriver, needle nose pliers, or a toothpick to get the balls out. Clean every bearing surface thoroughly, including the cones, ball bearings, and the cups inside the hub.
Now pack the hubs with bearing grease and place the correct number of balls in each side. I use either marine bearing grease or automotive grease because they're really cheap, waterproof, and quite frankly better than anything that's specifically made for bikes. Using petroleum jelly like vaseline will eventually ruin the bearings (don't ask how I know..).
Now carefully slide the axle back in place and secure it with the cone that you removed earlier. Just hand tighten it, it's ok to leave some play in the axle for now.
Replace the spacers and the locknut in the order that you removed them. Now you need to dial in the bearing adjustment. For wheels with nutted axles you simply adjust the bearings until they have a slight drag (you should still be able to turn the axle with your fingers, but there should be no play at all).  

Quick release axles are trickier since there should be a very tiny amount of play when the wheel is off the bike. The quick release skewer will slightly compress the bearings, eliminating this play. 

To tighten bearings quickly, put an adjustable wrench on each locknut and tighten them together:
To loosen, just put a cone wrench on each cone if both cones are accessible. Rear cassette hubs usually have to be loosened from the non-drive side, so if it is overtightened you loosen the locknut, then unscrew the cone a little and tighten the locknut again. Do this in small increments. Check the adjustment with the wheel on the bike and the skewer clamped down. Feel for play in the wheel inside the frame. Finally check the locknut's tightness (nice and tight, but don't overdo it) and you're done!