Let's start with the fork. Clean all the headset bearing pieces, then pack them with grease:
Now you can reattach the fork to the frame. Make sure the bearing cages are facing the cups the right way (as shown above), or else the cages will just grind around inside the cups.
You need to make sure the threads on the fork are clean and don't have any grease on them. I also added some blue threadlocker to keep the headset from coming loose when you actually go mountain biking. 1-1/8" headsets don't really have this problem, but these old 1" forks get loose after a few hours of rough trail riding. You should screw the top race on until fork play disappears, then unscrew it a tiny bit. Now you can tighten down the locknut:
I used a mop handle to brace the fork while tightening the nut. It needs to be really tight, but unfortunately you can also strip out the threads in the locknut if you overdo it. I guess experience will tell you when to stop. Moving on, I installed the handlebars:
One neat trick about having the cables all loose is that you can slide the housings out of the way and put some light grease or oil on the inner wire:
Then you can just slide the housing back in place and clip it back into the cable stop on the frame. With the brake cable and cantilever studs lubricated, I reinstalled the brake. The screws that hold the brakes on shouldn't be overtightened, or else the brake will bind. It's a good idea to add some threadlocker to the screw threads, and they often come with it from the factory. Also, keep track of which hole you attach the brake's springs to. They need to match on both sides, otherwise one of the pads will always rub the rim.
Let's do work on the bottom bracket now. I dealt with the surface rust inside the shell with some Lime-Away, and then a coating of marine bearing grease to prevent future rust. I also soaked the bearings in mineral spirits to get the caked up dirt and rust out of the cages:
Next I packed them full of grease and placed the bearings in the cups:
It's nice to use a thicker grease here because you really need the bearings to stay in place as you screw the cups back into the frame:
It's important to grease the threads in the shell and make the right side cup very tight. Next you should screw the left side cup in until you can't turn it by hand anymore, then secure the adjustment with the lockring:
Check for play or binding in the spindle afterwards. It also helps to oil the lockring's threads to keep the cup from turning with it. Now the cranks can go back on. These are held on by 14mm nuts. Make these nice and tight, you really don't want them coming loose. I used my $10 Harbor Freight torque wrench set to 27 ft-lbs on these:
You certainly don't need a torque wrench to work on old bikes, but since I have one now why not use it?
Before reinstalling the rear derailleur I dripped some oil in the pulleys:
With the wheels and seat back on it's starting to look like a bike again:
Time to adjust those brakes. The cable clamp on the brake itself is sort of like the coarse adjustment for the brake. You want to clamp the cable in a position where the brake pads will actually touch the rim when you pull the lever:
The brake doesn't have to feel perfect yet, because you can use the barrel adjuster on the brake lever to fine tune the brake feel. The same logic applies to shift cables, where you clamp the cable to the derailleur in a useable position, then fine tune the shifting with the barrel adjuster.
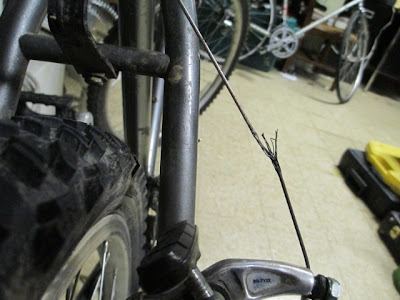
The front brake cable was perfectly fine on this bike, but unfortunately the rear was another story:
I will always reuse cables if they're clean and intact, but if they're frayed like this then they need to go. After replacing the cable, I put the chain back on so I can adjust the shifting:
Now the bike is pretty much finished. What's left is to ride it around and fine tune the brakes and shifters.
All in all this was a really easy project. It only needed one replacement cable, but I should plan on replacing the brake pads too since they're old, hardened, and grind the rim when I brake. After that this should be a very capable trail bike. Cheers.


No comments:
Post a Comment