Then I adjusted the headset by screwing the top race almost all the way down, then tightening the lockring and then the top nut to lock it in place (your headset probably won't have an additional lockring so you would just secure the top race's adjustment with the top nut). Here are the headset pieces in the order which they are installed:
There should be no play in the fork, but it must also spin easily. Next I wanted to work on the bike upside down so I installed the saddle and handlebars (without the brake cables installed so that I don't kink them....I need a work stand). Now I could install the bottom bracket:
The adjustment is similar to the headset, you just screw in the adjustable cup until the play is gone and then tighten down the lock ring. I prefer to adjust these a little tight at first because they seem to loosen up a bit on their own. Now comes the cranks and pedals:
The crank bolts themselves will tighten the cranks onto the spindle. These should be at least 25 ft-lbs, but if you don't have a torque wrench you can just stop after you feel a noticeable increase in resistance (this means the crank is fully seated). The pedals should also be very tight, they go on with a 15mm wrench.
Next I temporarily put the wheels on so I could work on the brakes:
My camera likes natural light so much better. Anyway once all the pads are centered and securely tightened you can center the brake itself. You can loosen the mounting nut and rotate the brake arms until the pads are both an equal distance from the rim, then tighten the nut down:
Now comes the cable adjustment. The brake cable attaches to a straddle wire with these centerpull brakes, so you have to thread it through the little bolt on the cable hanger:
Once the cable is installed you just need to pull all the slack out of the inner wire (and pull the straddle wire up in this case), then tighten the bolt and nut together as shown. Make further adjustments with the barrel adjuster to bring the pads a desirable distance from the rim for good stopping power. Here are all the cables reinstalled (I removed them all for cleaning and inspection since sticky or frayed cables don't work well):
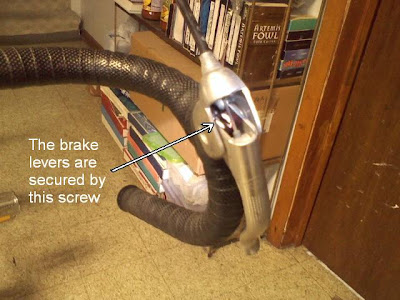
If your brake levers themselves are loose, then now would be as good a time as any to tighten them down:
Next I reinstalled the rear derailleur:
After that I repacked the wheel hubs (not the most efficient way to do things but whatever):
Disassembled for cleaning:
Cleaned, regreased, and adjusted:
New tires and tape:


Amazing that I found this, I'm working on the same bike!Does it have 27 inch wheels?
ReplyDeleteIndeed it does.
DeleteHi, I just got a Fuji Sport 10 and it seems that there's some unusual resistance in the bottom bracket. Can you tell me if anything, what you did with the BB on this fuji? Thanks for the great detail and pics in your blog post!
ReplyDeleteCheck that the back of the kickstand isn't rubbing the chainrings (I took apart a bottom bracket once, only to find this as the problem later). If not, then either the bottom bracket bearings are too tight, or the ball bearing retainers have been installed backwards. I went into more detail about these bottom brackets in this post: Adjustable Bottom Bracket Service
ReplyDelete